Practice 1. 버튼 클릭시 화면의 이미지 이동하기
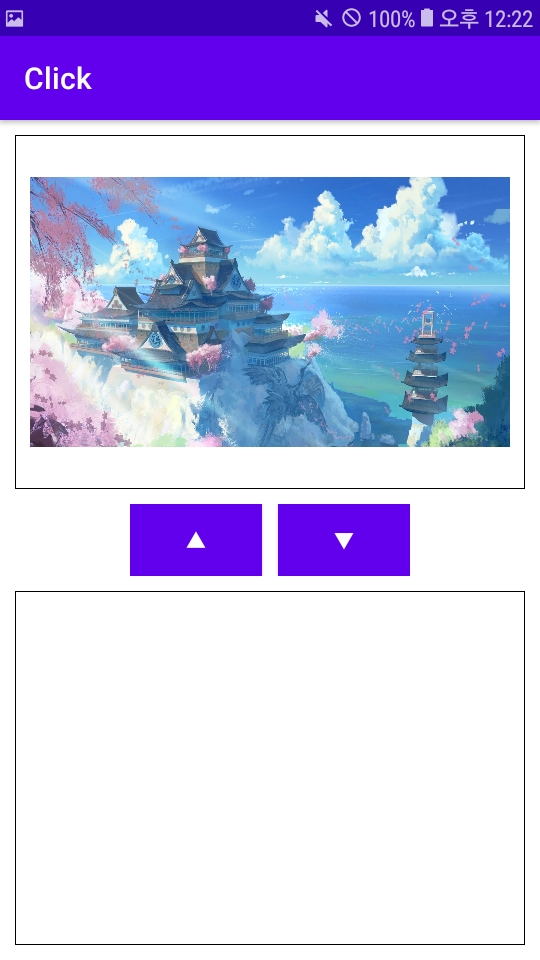
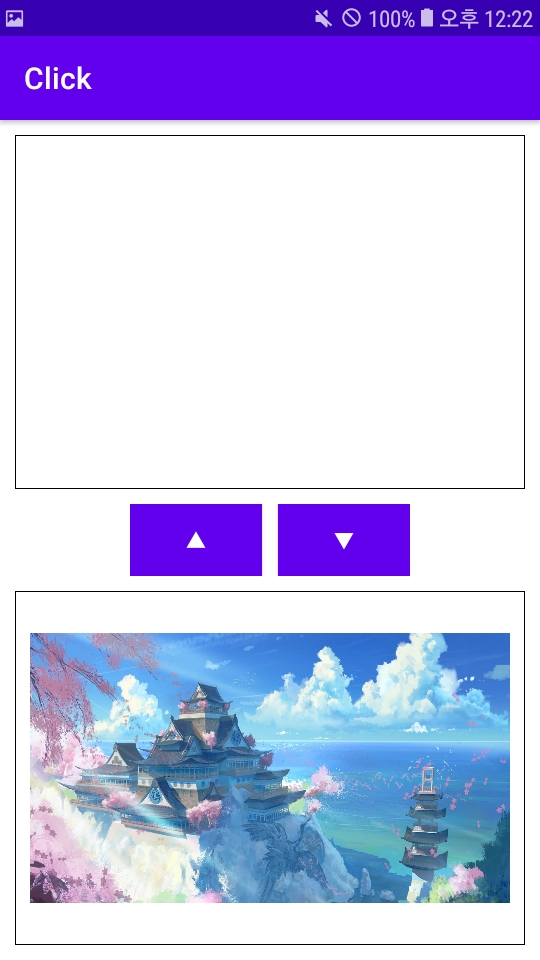
아주 간단한 구현이라 따로 부가 설명은 적지 않고 소스코드만 공유 하도록 할게요 ~ 기능은 버튼 클릭시 사진이 위 아래로 움직이는 기능입니다!
(레이아웃 XML)
<?xml version="1.0" encoding="utf-8"?>
<LinearLayout xmlns:android="http://schemas.android.com/apk/res/android"
    android:layout_width="match_parent"
    android:layout_height="match_parent"
    android:orientation="vertical">

    <ImageView
        android:id="@+id/top_Img"
        android:layout_width="match_parent"
        android:layout_height="0dp"
        android:layout_weight="2"
        android:layout_margin="10dp"
        android:padding="10dp"
        android:background="@drawable/border"
        android:src="@drawable/egg"/>


    <LinearLayout
        android:layout_width="wrap_content"
        android:layout_height="wrap_content"
        android:layout_gravity="center"
        android:orientation="horizontal">


        <Button
            android:id="@+id/l_Button"
            android:layout_width="match_parent"
            android:layout_height="wrap_content"
            android:background="@color/white"
            android:text="▲"
            android:layout_marginRight="5dp" />


        <Button
            android:id="@+id/r_Button"
            android:layout_width="match_parent"
            android:layout_height="wrap_content"
            android:background="@color/white"
            android:text="▼"
            android:layout_marginLeft="5dp" />

    </LinearLayout>

    <ImageView
        android:id="@+id/bot_Img"
        android:layout_width="match_parent"
        android:layout_height="0dp"
        android:layout_weight="2"
        android:layout_margin="10dp"
        android:padding="10dp"
        android:background="@drawable/border"/>

</LinearLayout>
(main java)
package com.example.quiz1;

import androidx.appcompat.app.AppCompatActivity;

import android.os.Bundle;
import android.view.View;
import android.widget.Button;
import android.widget.ImageView;


public class MainActivity extends AppCompatActivity {
    ImageView topImg; // 위쪽  이미지
    ImageView botImg; // 아래쪽 이미지
    Button lButton; //왼쪽 버튼
    Button rButton; // 오른쪽 버튼


    @Override
    protected void onCreate(Bundle savedInstanceState) {
        super.onCreate(savedInstanceState);
        setContentView(R.layout.activity_main);

        // 객체화
        topImg=(ImageView)findViewById(R.id.top_Img);
        botImg=(ImageView)findViewById(R.id.bot_Img);
        lButton=(Button)findViewById(R.id.l_Button);
        rButton=(Button)findViewById(R.id.r_Button);

        // r  버튼 클릭시
        rButton.setOnClickListener(new View.OnClickListener() {
            @Override
            public void onClick(View view) {
                topImg.setImageResource(0);
                botImg.setImageResource(R.drawable.oulf);

            }
        });
        // l 버튼 클릭시
        lButton.setOnClickListener(new View.OnClickListener() {
            @Override
            public void onClick(View view) {
                botImg.setImageResource(0);
                topImg.setImageResource(R.drawable.oulf);

            }
        });

    }

}
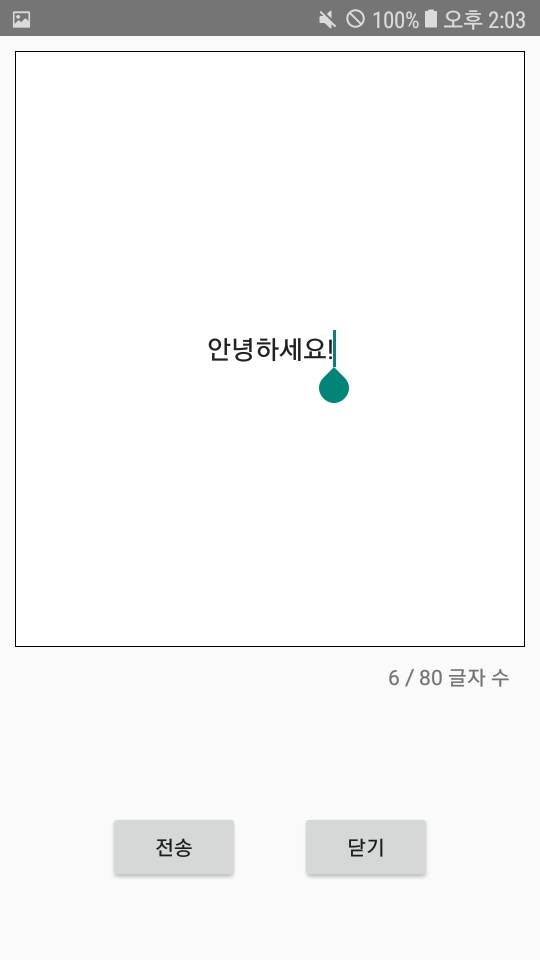
Practice 2. 메세지 보내는 화면 구현하기
요구사항
1. 윗쪽에는 텍스트 입력상자, 아래쪽에는 [전송] [닫기] 버튼을 수평으로 배치하기
2. 텍스트 입력상자 바로 아래에 EditText에 입력되는 글자의 수를 표시하고 글자는 최대 80글자까지 작성할 수 있으며, 입력되는 글자는 가운데 정렬 해주세요
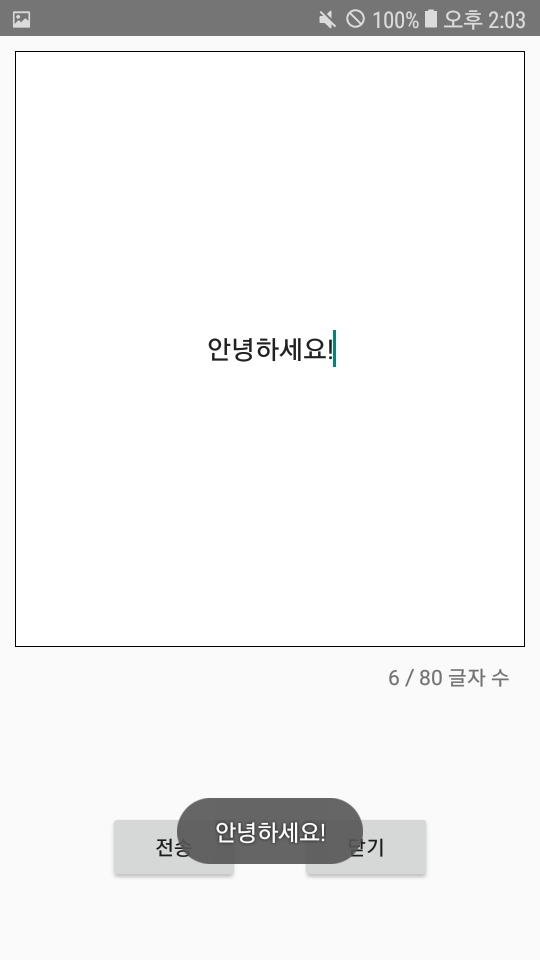
3. 전송 버튼을 누르면 입력된 글자가 화면에 토스트로 표시
처음 요구사항을 보고 다른건 다 알겠는데 edittext에 입력되는 글자를 표시하는 방법을 몰라서 어떤 이벤트를 사용해야 할지 찾느라 굉장히 애를 먹었네요 ㅠㅠ 그렇게 결국 addTextChangedListener()라는 이벤트를 사용하는걸 알게 되었고 그렇게 직접 구현하느라 꽤 오래 걸렸습니다 휴...
(레이아웃 XML)
<?xml version="1.0" encoding="utf-8"?>
<LinearLayout xmlns:android="http://schemas.android.com/apk/res/android"
    android:layout_width="match_parent"
    android:layout_height="match_parent"
    android:orientation="vertical">


    <EditText
        android:id="@+id/edit"
        android:layout_width="match_parent"
        android:layout_height="0dp"
        android:layout_weight="4"
        android:layout_margin="10dp"
        android:gravity="center"
        android:background="@drawable/sms_border"
        android:hint="내용을 작성해 주세요"
        />

    <TextView
        android:id="@+id/text"
        android:layout_width="match_parent"
        android:layout_height="0dp"
        android:layout_weight="1"
        android:gravity="right"
        android:layout_marginRight="20dp"
        android:text=" 0 / 80 바이트"/>

    <LinearLayout
        android:layout_width="wrap_content"
        android:layout_height="0dp"
        android:layout_weight="1"
        android:layout_gravity="center"
        android:orientation="horizontal">

        <Button
            android:id="@+id/but"
            android:layout_width="match_parent"
            android:layout_height="wrap_content"
            android:layout_marginRight="20dp"
            android:text="전송" />

        <Button
            android:layout_width="match_parent"
            android:layout_height="wrap_content"
            android:layout_marginLeft="20dp"
            android:text="닫기"/>

    </LinearLayout>
</LinearLayout>
(Main java)
package com.example.quiz1_2;

import androidx.appcompat.app.AppCompatActivity;

import android.os.Bundle;
import android.text.Editable;
import android.text.TextWatcher;
import android.view.View;
import android.widget.Button;
import android.widget.EditText;
import android.widget.TextView;
import android.widget.Toast;


public class MainActivity extends AppCompatActivity implements View.OnClickListener, TextWatcher {
    Button send; // 전송버튼
    TextView text;
    EditText edit;


    @Override
    protected void onCreate(Bundle savedInstanceState) {
        super.onCreate(savedInstanceState);
        setContentView(R.layout.activity_main);

        // 객체화
        send=(Button)findViewById(R.id.but);
        text=(TextView)findViewById(R.id.text);
        edit=(EditText)findViewById(R.id.edit);

        send.setOnClickListener(this);
        edit.addTextChangedListener(this);
    }

    // 버튼클릭 시 입력된 글자를 화면에 토스트로 표시하기 위해 onClik사용
    @Override
    public void onClick(View view) {
        if(view == send){
            String message = edit.getText().toString();
            Toast.makeText(getApplicationContext(), edit.getText(), Toast.LENGTH_SHORT).show();
        }
    }

    // 입력된 글자의 수를 계산하기 위해 addTextChangedListener 사용
    @Override
    public void beforeTextChanged(CharSequence charSequence, int i, int i1, int i2) {
        // 입력되는 텍스트에 변화가 있을때
    }

    @Override
    public void onTextChanged(CharSequence charSequence, int i, int i1, int i2) {
        String input = edit.getText().toString();
        text.setText(input.length()+" / 80 글자 수");

        //입력이 끝났을 때
    }

    @Override
    public void afterTextChanged(Editable editable) {
        //입력하기 전에
    }

}
혹시라도 제 블로그를 읽으시는 분이 계시다면 꼭 제가 만들어 놓은 UI를 먼저 따라해 보고 제 코드를 봐주셨으면 좋겠습어요!! 그외에 코드가 이해 안가는 부분이있거나 제가 구현한 방법보다 더 좋은 방법이 있으면 언제든지 댓글로 문의 주세요 환영 합니다 :)
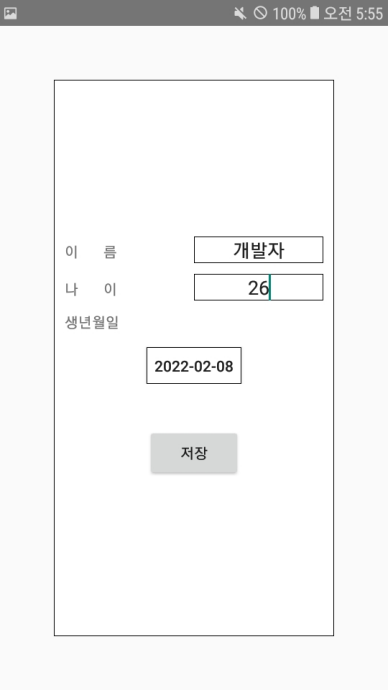
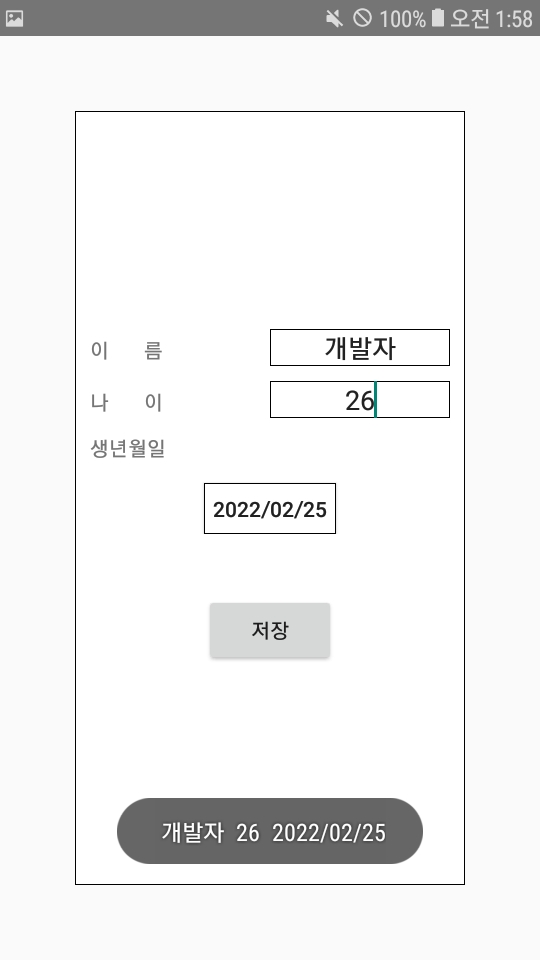
Practice 3. 고객 정보 입력 화면 구현
요구사항
1. 이름과 나이를 입력받기 위한 입력상자, 생년월일을 표시하기 위한 버튼 그리고 [저장] 버튼을 구성하세요
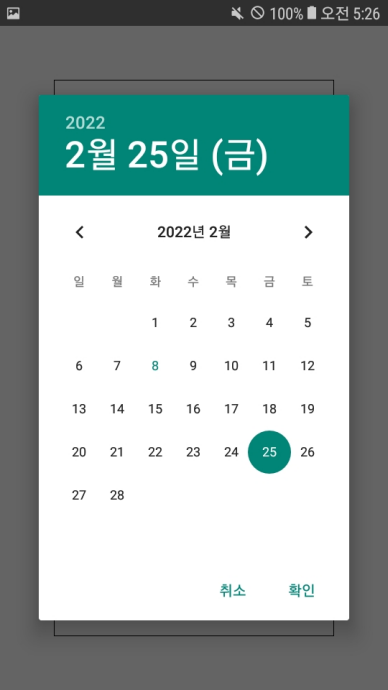
2. 생년월일을 표시하는 버튼에는 오늘 날짜를 자동으로 표시하며, 그 버튼을 누르면 [날짜선택] 대화상자를 띄우고
날짜를 입력받아 표시 하세요
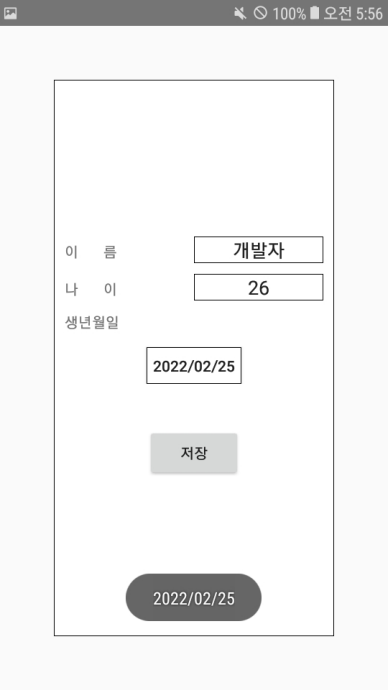
3. [저장]버튼을 누르면 토스트로 입력한 정보를 표시하세요
(레이아웃 XML)
<?xml version="1.0" encoding="utf-8"?>
<LinearLayout xmlns:android="http://schemas.android.com/apk/res/android"
    android:layout_width="match_parent"
    android:layout_height="match_parent"
    android:background="@drawable/border"
    android:layout_margin="50dp"
    android:padding="10dp"
    android:gravity="center"
    android:orientation="vertical">

    <!-- 이름 레이아웃 -->
    <LinearLayout
        android:layout_width="match_parent"
        android:layout_height="wrap_content"
        android:layout_marginBottom="10dp"
        android:orientation="horizontal">

        <TextView
            android:layout_width="0dp"
            android:layout_height="wrap_content"
            android:layout_weight="1"
            android:text="이       름" />

        <EditText
            android:id="@+id/name"
            android:layout_width="0dp"
            android:layout_height="wrap_content"
            android:layout_weight="1"
            android:gravity="center"
            android:background="@drawable/border" />
    </LinearLayout>

    <!-- 나이 레이아웃 -->
    <LinearLayout
        android:layout_width="match_parent"
        android:layout_height="wrap_content"
        android:layout_marginBottom="10dp"
        android:orientation="horizontal">

        <TextView
            android:layout_width="0dp"
            android:layout_height="wrap_content"
            android:layout_weight="1"
            android:text="나       이"
            />

        <EditText
            android:id="@+id/year"
            android:layout_width="0dp"
            android:layout_height="wrap_content"
            android:layout_weight="1"
            android:gravity="center"
            android:background="@drawable/border"/>
    </LinearLayout>

    <!-- 생년월일 레이아웃 -->
    <LinearLayout
        android:layout_width="match_parent"
        android:layout_height="wrap_content"
        android:orientation="vertical">

        <TextView
            android:layout_width="wrap_content"
            android:layout_height="0dp"
            android:layout_weight="1"
            android:text="생년월일" />

        <Button
            android:id="@+id/birth"
            android:layout_width="wrap_content"
            android:layout_height="0dp"
            android:layout_weight="1"
            android:layout_gravity="center"
            android:background="@drawable/border"
            />
    </LinearLayout>

    <!-- 저장버튼 -->
    <Button
        android:id="@+id/storage"
        android:layout_width="wrap_content"
        android:layout_height="wrap_content"
        android:layout_marginTop="40dp"
        android:layout_gravity="center"
        android:text="저장"/>
</LinearLayout>
(Main Java)
package com.example.quiz1_3;
import androidx.appcompat.app.AppCompatActivity;
import android.app.DatePickerDialog;
import android.os.Bundle;
import android.view.View;
import android.widget.Button;
import android.widget.DatePicker;
import android.widget.Toast;
import java.text.SimpleDateFormat;
import java.util.Calendar;
import java.util.Date;
import java.util.Locale;
public class MainActivity extends AppCompatActivity implements View.OnClickListener{
// 오늘날짜 버튼과 저장 버튼 클릭시 토스트 입력 버튼 객체 생성
Button Date;
Button stor;
EditText etName;
EditText etAge;
String result=""; // 이름,나이,생년월일 넣는 객체
// SimpleDateFormat 생성
long mNow = System.currentTimeMillis();
Date mReDate = new Date(mNow);
SimpleDateFormat mFormat = new SimpleDateFormat("yyyy-MM-dd");
String formatDate = mFormat.format(mReDate);
// DatePicker 생성
Calendar myCalendar = Calendar.getInstance();
@Override
protected void onCreate(Bundle savedInstanceState) {
super.onCreate(savedInstanceState);
setContentView(R.layout.activity_main);
Date = (Button) findViewById(R.id.birth); // 오늘날짜 버튼 객체화
stor = (Button) findViewById(R.id.storage); // 저장버튼 객체화
Date.setText(formatDate); // 버튼에 SimpleDateFormat 불러옴
stor.setOnClickListener(this); // 저장버튼 클릭 리스너 구현
// DatePicker OnDateSetListener 생성
DatePickerDialog.OnDateSetListener myDatePicker = new DatePickerDialog.OnDateSetListener() {
@Override
public void onDateSet(DatePicker view, int year, int month, int dayOfMonth) {
myCalendar.set(Calendar.YEAR, year);
myCalendar.set(Calendar.MONTH, month);
myCalendar.set(Calendar.DAY_OF_MONTH, dayOfMonth);
updateLabel();
}
};
// 오늘날짜 버튼이 클릭 되면 DatePickerDialog가 나오게 만드는 코드
Date.setOnClickListener(new View.OnClickListener() {
@Override
public void onClick(View v) {
new DatePickerDialog(MainActivity.this, myDatePicker, myCalendar.get(Calendar.YEAR), myCalendar.get(Calendar.MONTH), myCalendar.get(Calendar.DAY_OF_MONTH)).show();
}
});
}
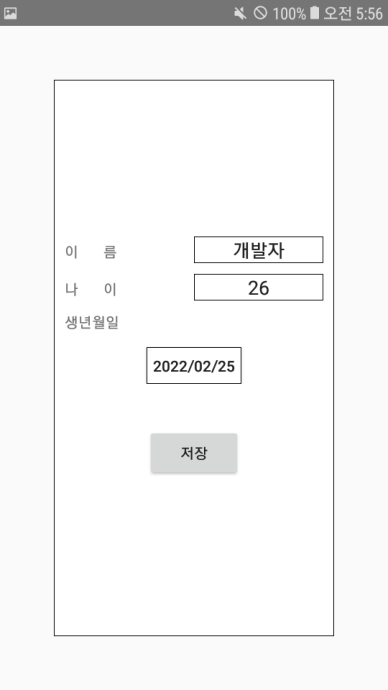
// DatePickerDialog에서 날짜를 선택하면 오늘날짜 버튼에 출력이 된다
private void updateLabel() {
String myFormat = "yyyy/MM/dd"; // 출력형식
SimpleDateFormat sdf = new SimpleDateFormat(myFormat, Locale.KOREA);
Date.setText(sdf.format(myCalendar.getTime()));
}
// 저장버튼 클릭시 이름,나이,생년월일 토스트로 가져오기
@Override
public void onClick(View view) {
result += etName.getText().toString() + " ";
result += etAge.getText().toString() + " ";
result += Date.getText();
Toast.makeText(getApplicationContext(), result, Toast.LENGTH_SHORT).show();
result = " ";
}
}
'프로그래밍 > 프로젝트' 카테고리의 다른 글
| 유데미 강의 React 완벽 가이드의 두 번째 프로젝트 (0) | 2023.04.24 |
|---|---|
| 유데미 강의 React 완벽 가이드의 첫 번째 프로젝트 (0) | 2023.04.24 |
| 안드로이드 프로젝트(1) UI 구현 (0) | 2022.02.17 |
| 자바 지뢰찾기(Minesweeper) (0) | 2022.02.09 |
| 깡샘의 안드로이드 Part2 도전과제 (토스트,액션바,국제화,다이얼로그,화면스크롤,키보드모드) (0) | 2022.01.17 |